The Short Story
- Toast your pecans (if you’re using them). Do not pass go, do not collect $200, toast the pecans.
- Choose your chocolate carefully. Chopped chocolate and chocolate chips are both great, but will give you different results.
- Smashing these cookies is essential. It’s not just cosmetic, it will change the texture of your cookie!
- Chilling the cookies for at least an hour is (unfortunately) essential.
The Longer Story
- This recipe is infinitely adaptable with mix-ins, but my favorite combination is chocolate and pecans. If you are using pecans (or any other type of nut such as walnuts), toasting them will make all the difference in your cookies. Toasting is the difference between cookies that just taste crunchy and cookies that actually taste like they have pecans (or walnuts or almonds or whatever) in them. To toast pecans, heat the oven to 350 F and spread pecans on a baking sheet in a single layer. Bake in 3-minute increments, stirring the pecans around on the baking sheet every 3 minutes. Pecans are done when they’ve darkened a bit and are fragrant.
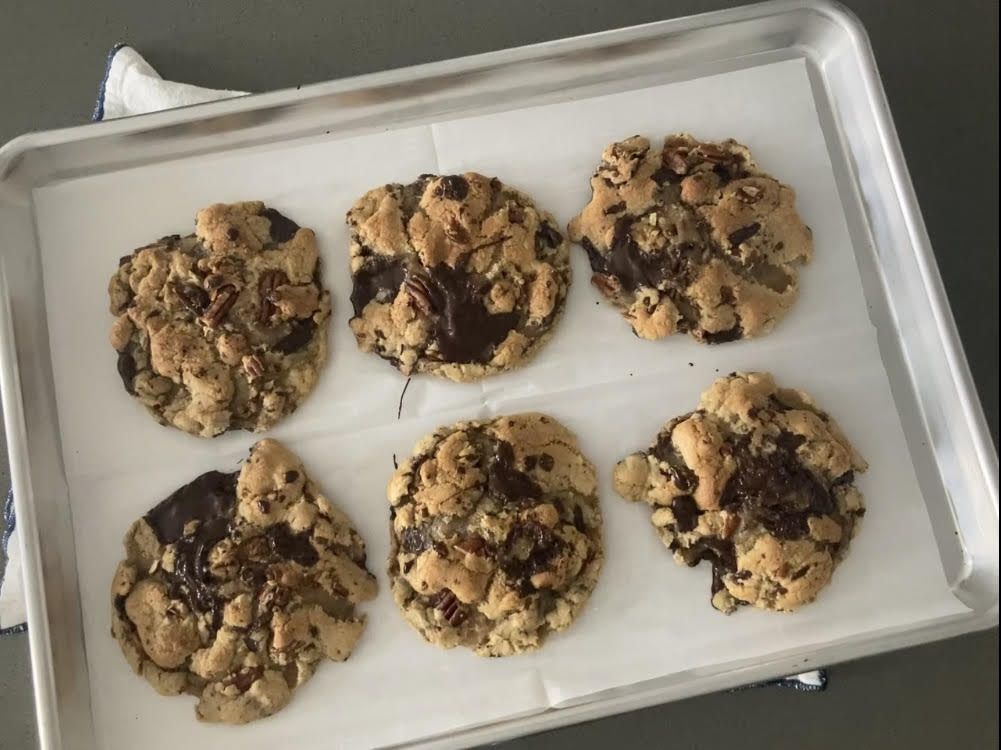
- For my cookies, I use 72% dark chocolate from Trader Joe’s. I think it’s perfect here, but you can really use any kind of chocolate you’d like. However, there are a couple of things to keep in mind. First, chopped chocolate from a bar (what I used) will create pools of chocolate in your cookies. Using chocolate chips will allow the chocolate to maintain its shape and stay contained. Neither option is wrong! Just know that it will make a difference, so choose your chocolate carefully. Second thing to keep in mind is that these cookies have a lot of complex flavors- in my humble opinion, milk chocolate overwhelms the other flavors and is too sweet. I would go with a semi-sweet or bittersweet chocolate before milk. But again, totally up to personal preference. But if you don’t have a strong initial opinion, don’t go for milk chocolate.
- These cookies are originally the “smash cookies” from Zoë François- smashing them down after baking is so important it’s in the name. It’s the brilliant way Zoë has created to get a soft, chewy cookie that isn’t completely cookie dough inside. Since the cookies are chilled and baked in large portions, there will be a puffy bunch of dough in the middle when they’re done baking. Smashing them down right after they come out of the oven helps get the happy medium texture between crunchy and dough-like.
- One of my least-favorite baking facts is that chilling your cookie dough is (often) extremely important. I get it, no one wants to wait to bake the cookies you just worked so hard for. But, hear me out, all your hard work won’t be the same if you don’t wait- don’t waste everything you just did! Chilling the dough for a minimum of 1 hour not only means you’ll get a better, chewy cookie texture, but also allows the flour to hydrate further and more complex flavors to develop. Please, please just be patient for at least an hour. I promise it will be worth it!
Ultimate Chocolate-Anything Cookies
Recipe originally from Zoë François at zoebakes.com
Ingredients:
– 420g (3½ cups) all-purpose flour
– 1 tsp baking powder
– 1 tsp baking soda
– 1¼ tsp kosher salt
– 200g (¾ cup + 2 Tbsp.) unsalted butter, melted and cooled slightly
– 450g (2¼ cups, lightly packed) brown sugar (light and dark brown sugar both work)
– 2 tsp pure vanilla extract
– 2 eggs at room temperature (being at room temp will help them blend more easily into the dough)
– 280g (roughly 2 cups) whatever mix-ins your heart desires. I used half chopped chocolate and half toasted pecans. Other ideas include dried fruit, walnuts, m&ms, peanut butter cups, shredded coconut, seeds, chopped candy bars…sky’s the limit.
Instructions
- In a medium bowl, whisk together the flour, baking powder, baking soda, and salt. Set aside.
- In a large bowl, whisk together the melted butter, brown sugar, and vanilla until uniformly mixed. Add the eggs, one at a time, whisking until they are incorporated. With a spoon or spatula, mix in the flour mixture all at once until just incorporated. It should be quite thick, but not dry. Add whatever mix-ins you’re using.
- Line a 9×13 baking sheet with parchment paper. Use a baking scale to create 120g (4.25-ounce) dough balls. If you don’t have a scale, eyeball the dough into 12 equal pieces. Don’t flatten them; the dough balls should be the shape of a baseball. Refrigerate the dough balls on the prepared baking sheet for at least 1 hour; if you have the time, the cookies will be even thicker if you let them sit for 24 to 36 hours. After they are chilled, you can bake them or freeze the dough balls for baking later.
- Preheat the oven to 375°F/190°C convection heat (or 400°F/205°C flat heat). Double up two baking sheets and line with parchment paper. The double sheets will prevent the bottoms from over-browning in the hot oven. Evenly space six chilled dough balls on the prepared doubled baking sheets. Leave 2 inches/5 centimeters between them so they can be smashed after baking. Bake, one sheet at a time, in the middle of the oven for about 12 to 14 minutes or until they are golden brown on the outside, but still soft in the center.
- Remove the sheets from the oven and while they are still hot, gently smash the cookies with anything flat and heat-proof (I use the bottom of a cake pan but you could also use a metal spatula, bottom of a drinking class, etc.) so they are ½-in. thick disks. Allow the cookies to cool for about 5 minutes on the baking sheets, then move to a cooling rack.
- Enjoy!
I appreciate the explanation behind the (extra) steps and what to expect if you do or don’t skip those steps. These look amazing. Also—yay for measurements in grams! Does the recipe change at all for changes in altitude? Thank you.
Thank you! I haven’t done anything differently to account for altitude changes, and for something like cookies where there isn’t a ton of rising going on (like in bread), you’re probably fine to just keep it the same!